Monday 30 December 2013

Thank you, Secret Santa!! xxx

It's late, I know, but I just wanted to quickly share what my Secret Santa got me for Christmas this year.

Create Your Own Needle book Kit


It's a Create Your Own Needle book Kit! The instructions are simple to follow - it gives you an idea for the design, but really you can make it whatever you want with the pieces provided! I shall look forward to making that! My Secret Santa also gave me a Hobbycraft gift card, which gives me a good excuse to go! (especially as my new school is about a mile from a store - could be fatal!)

As long as I'm sharing crafty gifts, I was also given these kits as part of my leaving present from Chesham Bois - someone knows me very well!

Humphrey's Corner "Flowers for You"


"London Bus" by DMC

Friday 27 December 2013

Handmade Christmas Gifts

Merry Christmas everyone! I hope you had an amazing day however you chose to spend it!! 

Now that the big day's been and gone, I can post photos of the gifts I made for my Mum. I cross stitched two Christmas Tree decorations and decopatched a mannequin for her.
Decopatch Mannequin

First, the mannequin. I used Glossy Glue and Decopatch paper - I tried to keep the patterns on the paper whole rather than ripping through them. After covering the shape with the paper, I spread a thin layer of the glue over the top to create a varnish. The whole project took about an hour and a half, not including drying time. My mum's going to put it in her sewing room. I have another mannequin at home to decorate for my sewing room but I haven't decided what paper to decorate it in yet.


Ice Skate "Winter Wonderland" design
Then, the cross stitch tree decorations. As I mentioned previously, my friend Jenny inspired Isla and I to try making some. I took the designs from The World of Cross Stitch Magazine and stitched onto 14 count plastic canvas with DMC thread. After the cross stitch and backstitch, I then used some sticky felt and ribbon to finish. Each decoration took 4-5 hours but they were fun to make and they look really good hanging on my mum's tree! I hope to make lots more decorations for next year.
Rudolph!


Tuesday 24 December 2013

An Update

It's been a long time since I posted on my blog - I've been in a bit of a crafty lull as a result of changes in my job, but let me get you up to speed on the few things I've been doing.

My talented fellow cross stitcher friend, Jenny, makes amazing Christmas Tree decorations - including the one pictured below that she gave Bren and I for Christmas this year. So, I decided to try making some of my own. I was hoping to make some for my friends, family and penpals but of course other events put me behind. I've made a couple as Christmas presents but you'll have to wait until after Christmas to see those!

Snowflake decoration made by Jenny
Christmas pudding "N" initial - pattern taken from World of Cross Stitching magazine

I haven't managed to do much more of my "Dictionary of Cakes" piece, but I'm hoping to do lots over the Christmas break. I'm aiming to have it finished by the end of February - I'd say January but I'm being realistic and taking new job into account. I'm also aiming to complete one of these pieces from issue 211 of The World of Cross Stitching Magazine in honour of my impending trip to Paris with Bren. I haven't decided which one yet, but if I can change the hair colour to brown like mine then I'll probably do the bigger piece.

"Paris: Je t'aime" Issue 211 The World of Cross Stitching Magazine


The World of Cross Stitching Magazine Issue 212
 In other exciting news, I was part of the reader panel in Issue 212 of The World of Cross Stitching Magazine! All I had to do was send an email with a recent photograph of myself and in a few weeks the emailed back asking if I'd like to be on the panel for Issue 212. They then sent me a questionnaire for me to complete about my stitching history and habits and asking for my opinions of the featured patterns. As a thank you, I got a gift package of Madeira theads, needle threader and cutter, embroidery scissors, thimbles and needles.


Saturday 2 November 2013

Festive Rudolph

I was very pleasantly surprised when I got home yesterday afternoon and found that the latest issue (210) of the World of Cross Stitching magazine had arrived. There were lots of Christmas ideas and this free kit, which I've already done!

Festive Rudolph designed by Lesley Teare
This was a very quick and simple design to stitch - even the backstitch didn't take too long! I used double sided tape to mount the design in the card (which came as part of the gift) and then I added some glitter to the snowflake in the top right corner, some of the  stars on the left and the tiny stars and hearts along the bottom. I used My Craft Studio's Extra Fine Glitter in Crystal and a Quickie Glue pen - it didn't take me very long to do and I think it looks effective.


I've decided to jump on the bandwagon with Jenny and Isla and try making Christmas tree decorations using plastic canvas, sticky felt and ribbon to give out as gifts. I'm also going to try making chocolates, but I'll have to have a lot of practice and testing with that - shame!!

Wednesday 30 October 2013

The dog and the piggy-bank

Yesterday, my mum and I had a really lovely day together. It was the first in a long time that I actually felt well enough to leave the house so we went to Hobbycraft to spend the gift vouchers I got for my birthday - thanks Lizzie and Louise! I bought some card making papers and attachments and some chocolate making pieces. We also bought some Decopatch because my mum said she wanted to try it - so we spent the afternoon Decopatching!

My dog before Decopatch
 I actually bought a mannequin to decorate and give to my mum as a gift (and one for myself) but I thought since I bought this dog ages ago I
should do that first!


Mum's piggy-bank before Decopatch
In case you don't know; with Decopatch you take the item that you want to cover (either a papier mache type structure like we did or something else, like a folder, cupboard - it can be done on just about anything really!), tear of chunks of decorative paper and glue them on. It's as simple as that!

My dog - finished! 

Finished letters


As I finished my dog before my Mum finished her piggy-bank, I thought I'd start on something else I bought ages ago: my "DREAM" letters. I decided to decorate them in different purple papers to go in my bedroom. Was actually really hard to do the letters and I don't think they came out as well as they dog did, but still; they've got my individual style and flair?! I think I'll paint a rectangular piece of wood in a light pastel colour to stick the letters to.


This is my mum's first finished decopatch project - I'm very impressed, aren't you?!

Musical piggy!

My next Decopatch project will be the mannequins. I think my mum enjoyed her day of Decopatch so hopefully she'll do it again!

Friday 18 October 2013

New and Exciting Craft Goodies !! =D

Those of you who know me well will know I've been having a tough time lately, so I thought a little pick me up was well overdue.

Cue: the DANGER CHANNEL!! (aka Create and Craft)

I watched one show by My Craft Studio and was the most inspired than I have been in a long while so I invested in some goodies!

2 tier cake carrier from Kitchen Craft - holds 24 cupcakes. You can even swing it from side to side and the cakes will survive - raises the chances of survival after I've driven them somewhere!

Fine crystal glitter in a range of colours (from My Craft Studio) and Quickie glue pens.

Tiny gemstones - in multicoloured and silver. Also comes with applicator tweezers and glue.

My Craft Studio 6th Anniversary Edition CD ROM Set

(Top to Bottom; left to right) All About Boys, Fairy Land (not part of the set - I just liked it!), Music and Dreams, Digistamp Delights, Elegant Ladies, Precious Paintings, Woodland Wonders, Treasured Teddies, All About Lace, Flourishing Florals and Bright and Breezy


I really liked the CD Rom set because not only does it give you a wide range of toppers, backgrounds, sentiments and embellishments but it also allows you to change the colours and build the elements up on the screen - it's a complete design package. I haven't actually tried it yet, but I'm looking forward to experimenting and seeing what I can create! I think the quickie glue pens will be really easy to use and will allow me to use glitter more effectively (any excuse for a bit of glitter!!)

If you have a birthday coming up, or know someone who is, leave a comment below and you never know - I might make you a card! =P

Sunday 6 October 2013

Happy birthday Nanny!

Over the summer holidays when I was looking through my collection of World of Cross Stitching magazines, I found a design for a card that I thought would be perfect for my Nanny's birthday this year.

The design came from issue 202 and didn't take that long for me to sew. I started on Friday night and finished it Saturday lunchtime. It was fun to stitch and it looks really effective - I think my Nanny will like it!


Today, I took a trip to Hobbycraft with my mum to get the finishing touches for the actual card. I bought the aperture and matching envelope, some ribbon and a matching bow. After I put it all together, this was the finished result:

Have a lovely day
Inside message tag

 To make the ribbon detailing oon the front, I cut two pieces of ribbon and glued them down the sides, and then added a pre-made ribbon in the corner. To make the message tag, I used a label punch in two sizes to cut the cream and purple paper. Then, I stamped "Happy birthday" onto the cream using black Memento ink. I used foam pads to stick the cream tag to the purple and added pearl gems and ribbon.

Final touch!


Sunday 29 September 2013

A Dictionary of Cakes!

September 29th 2013
Yesterday I started "A Dictionary of Cakes" by Bothy Threads to hang in my kitchen. I love the fun "Catchphrase" style of these designs - look at each picture carefully!

"A Dictionary of Cakes" by Bothy Threads.
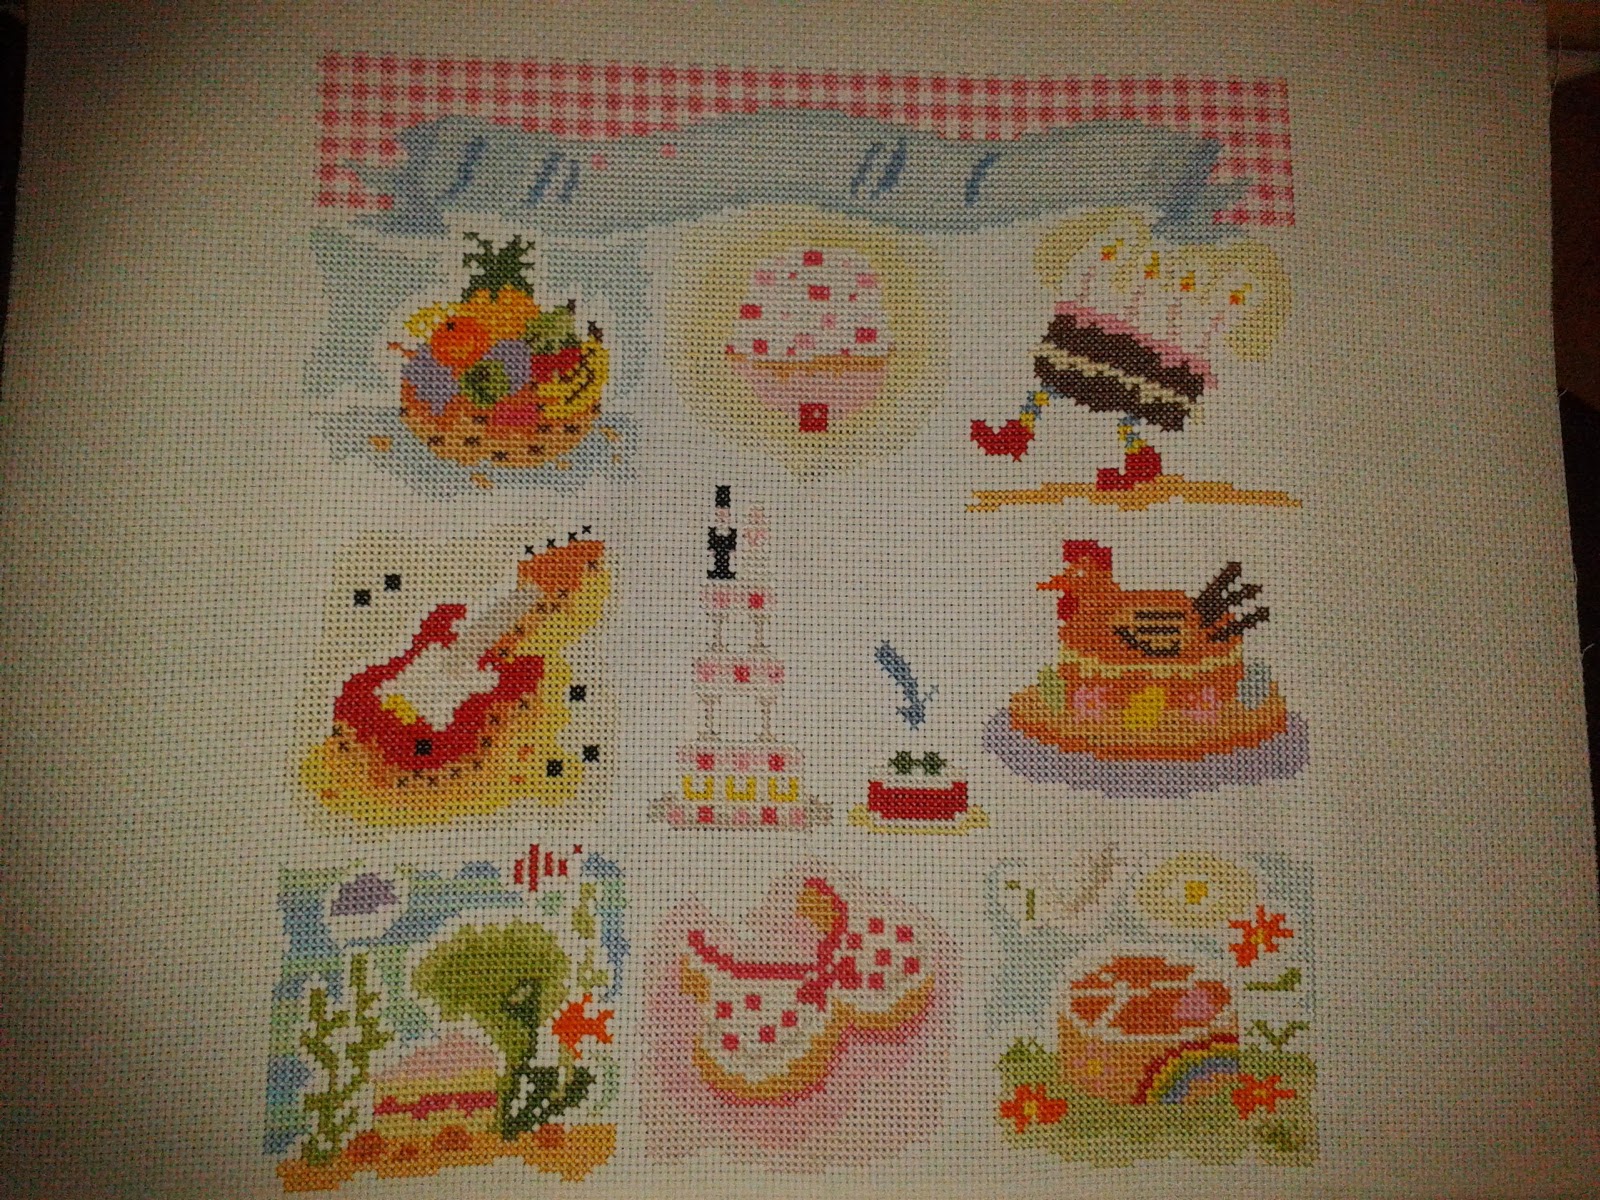
As I've spent all weekend in recovering from a cold, I've managed to make a lot of progress already. I've decided I'll post al the pictures of this project to this post (just like I did with the chocolate labrador) so we can see the transformation.

29/9/13 - Total Progress so far.


28/9/13 - "Short Cake": finished (minus backstitching)
29/9/13 - "Layer Cake": finished (minus backstitching)


October 10th 2013
I powered through the first two images, but the next one took me a little longer, mostly due to work commitments and being ill. But, I finally finished it today!

10/10/13 - About half way through!

12/10/13 - "Rock cake": finished! (without backstitch detailing)

Middle row: finished! (Left to right) Rock cake, Short cake, Layer cake. Get it??

October 13th 2013
Next, I began work on "Sponge Cake". The background for this mini-design is puzzling me though. The majority of the background is made up of one symbol, which translates to cross stitching in 1 strand of a variegated thread. The variegated thread is actually just 3 strands of 3 separate colours; normally I'd put a strand of each colour together and stitch with that, but the instructions clearly say it should be 1 strand. Looking at the cover picture, the 3 different colours are stitched in patches, but there's nothing on the chart to say this - so I'm guessing I'm meant to make it up as I go along? Anyway, I've decided to leave the background for the moment!

13/10/13 - "Sponge Cake": Finished! (except for background and backstitching)
Overview so far! (Left to right, Top to bottom: Rock cake, short cake, layer cake, sponge cake)


October 27th 2013
I soon began work on the next cake, but progress was slow. Then, last week I was struck down with the most dreadful flu - it was so bad I didn't even have the strength to pick up a needle until today!! (8 days after I first became ill). So, I've just finished the fifth cake picture that I was working on, and I finished the background for "Sponge Cake". The mystery of the variegated thread for the "Sponge Cake" background was easily solved by the way: if you remove the thread from the thread keeper, it's easy to see that the colour does actually change throughout the strand - my eyes were just too tired to see it!! The finished result looks really good!

27/10/13 - "Cupcake": Finished! (Except for the backstitching)
27/10/13 - "Sponge Cake": Finished! (Except for the backstitching)
Overview so far! 27/10/13 (Left to right, Top to bottom: Rock Cake, Short Cake, Layer Cake, Sponge Cake, Cup Cake)

October 28th 2013
After not doing any stitching for so long, I felt the urge to do loads today! Once I got started it was very hard to stop! It has taken me most of the day (on and off) but, thankfully, I think I can say I'm fully recovered from the flu now! (except for still eating tiny irregular meals)

28/10/13 - "Peace of Cake": Finished! (Except for the backstitching)

Overview so far! 28/10/13 (Left to right, Top to bottom: Rock Cake, Short Cake, Layer Cake, Sponge Cake, Cup Cake and Peace of Cake)


December 31st 2013
I'm ashamed to say I've neglected this project in favour or various other projects, but I've made it my January Goal (I make monthly goals rather than New Year's Resolutions) to finish and frame "A Dictionary of Cakes". The last time I was working on this, I made a rather frustrating mistake on "Upside Down Cake" so I started by correcting that. Of course, I went on to make an even bigger mistake that I was unable to fix, but hopefully you can't tell!

31/12/13 - "Upside Down Cake": Finished! (Except for the backstitching)


Overview so far! 31/12/13 (Left to right, Top to bottom: Upside Down Cake, Rock Cake, Short Cake, Layer Cake, Sponge Cake, Cup Cake and Peace of Cake)

January 1st 2014
Happy New Year! I'm pleased to say that progress on this January Goal is good! Last night, I started "Fruit Cake" and I finished it tonight. The final cake is "Cake Walk" and then it'll be time to do the banner across the top.

1/1/14 - "Fruit Cake": Finished! (Except for the backstitching)

Overview so far! 1/1/14 (Left to right, Top to bottom: Fruit Cake, Upside Down Cake, Rock Cake, Short Cake, Layer Cake, Sponge Cake, Cup Cake and Peace of Cake)

January 2nd 2014
I decided to power through with "Cake Walk" and have just finished! Onto the banner at the top now!

2/1/14 - "Cake Walk": Finished! (Except for the backstitching)


Overview so far! 2/1/14 (Left to right, Top to bottom: Fruit Cake, Upside Down Cake, Cake Walk, Rock Cake, Short Cake, Layer Cake, Sponge Cake, Cup Cake and Peace of Cake)
January 5th 2014
It's taken me a few days, but I've finished the banner that goes across the top. All of the cross stitches are done now so the next stage is all of the backstitching!

Finished Overview (except for backstitch) 5/1/12: The banner will read "A Dictionary of Cakes"

January 6th 2014
I've already made a good amount of progress with the backstitch and I'm so pleased with how well it's turning out! All of the black outlines in this picture use two strands of black thread but the rest will use only one to create depth.

If you didn't get the "Catchphrase" style jokes before you might now!

I've also just finished "Fruit Cake" Here's a "before" and "after" comparison:

"Fruit Cake" before ...
... and after!


I'm going back to work again tomorrow so progress will be greatly reduced from now on, but I'm pleased with how far I've come and I'm sure I'll be finished by the end of January!

January 8th 2014

I managed to backstitch "Upside Down Cake" and "Cake Walk" tonight. They took about 45 minutes each, whereas "Fruit Cake" took me hours because of all of the detailing to make the fruits.


January 12th 2014
I've made lots of progress with my cross stitch this weekend. In fact, I've finished it!! All I need to do now is to frame it.