Thursday 18 April 2013

Bojangles Butterfly ... finished!

You might remember from a previous blog post that I painted a ceramic butterfly at Bojangles last week.

Well, I've just been to pick it up after they fired it and I'm soooooo happy with it! The yellow and green paint came out a lot smoother than I thought it would; purple not so smooth but in a way it adds to the effect of textured wings!

Shiny!

This is how the butterfly will look when it's sitting on a surface (the wings are at a 90 degree angle to each other)

Rachel and I have already booked in another Bojangles visit ... I wonder what we'll come back with??!

Saturday 13 April 2013

Raspberry Cupcakes (Nom Nom Nom!!)

That's right: I finally braved the cupcake challenge. I've made fairy cakes before, but cupcakes are just a bit bigger, aren't they? It was also the first time I'd used a recipe from the second cookbook my mum gave me for Christmas "Cupcakes from the Primrose Bakery." If you enjoy cupcakes, check out that book!!

The batter recipe is simple enough: butter, caster sugar, eggs, self-raising flour, milk, vanilla extract and raspberry jam.


So far, so good!!


Then I iced them with white chocolate buttercream icing, which is simply vanilla buttercream icing with added melted white chocolate and double cream. Both icings taste absolutely incredible!

Some artistic shots, as captured by my boyfriend, Bren.


Finally, added some raspberries and a few red sprinkles ... viola!

These two are reserved for my mum and her friend Ange - who have done a lot to help me over the last 6 months.

They taste as good as they look =D Added bonus: I still have some vanilla buttercream icing left so I guess it'd be a shame not to use it wisely ...

Sweet Pretzels

Today, I decided to try another intriguing recipe from my Mary Berry Baking Bible - Sweet Pretzels.


Bearing in mind I started at 9:30 last night after a Sainsbury's shop and dinner; the recipe was simple to follow and the whole process took less than an hour. I've never had much luck with dough but I enjoyed playing with this dough because it wa like an edible, springy stress ball =D They taste pretty good too, although, having never made them before not sure what they're meant to taste like!! Bren ate three though, so can't be that bad!

Today, I might brave the raspberry cupcakes ... wish me luck!!

Thursday 11 April 2013

Bojangles Butterfly

Today, my friend Rachel and I spent a lovely afternoon in Bojangles - the craft cafe in Amersham. In case you're unfamiliar with the concept: you pay £5 studio fee, which includes unlimited paints, unlimited time and the firing process in the kiln after you've finished, and then you choose a ceramic item to paint (which are all individually priced) and that's it! You can also do some decopatch - which is like decorative papier mache essentially: really simple but so effective! I don't think you pay the studio time, because you do pay for the papers, glue and brush in addition to the item you're decopatching BUT you do get to keep the leftover paper, glue and brush.

So, today we spent a good 4 hours crafting. I painted a ceramic butterfly and Rachel did some decopatch stars. This was Rachel's first decopatch adventure and she did really well! She picked it up so quickly and she was even brave enough to use 3 different papers! I don't have any pictures, but take my word for it - they look great! =D

My ceramic butterfly took me a long time, but I think it was worth it because I love it! In order to achieve good colour after it's been fired, you have to paint 3 layers. I decided to use 4 colours and some of it was very fiddly, but I don't mind taking the time to get nice crisp edges if I can!

This is my butterfly - who is currently, unnamed =( - before firing. Next Thursday, I'll be able to pick her up and she'll have been fired and will be ready to come home. The colours will look shinier after firing, but this will give you an idea.

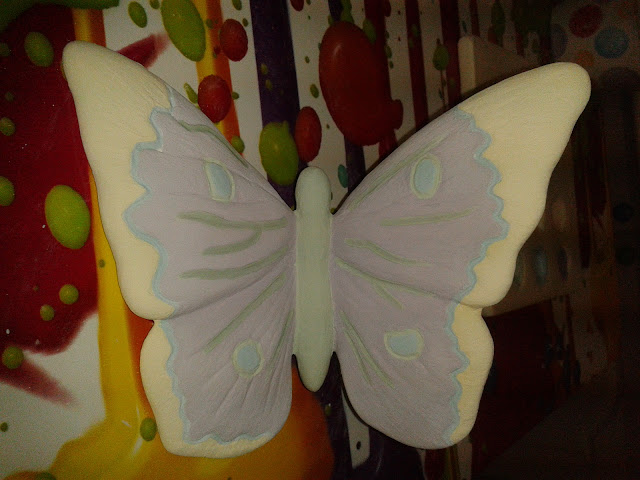
Because it's not been fired yet, the colours aren't so bold and obvious here so I shall tell you. The main colour on the wings will be a dark purple, with a lemon yellow on the edges. There are 4 blue spots, a green body and green in the folds of the wings. I also painted the back yellow, because the butterfly rests with one wing flat on the surface and the other one sticks up at an angle, so the back will be on show!

Friday 5 April 2013

Owl mania ... 3!

This morning I designed these "Blocky" owls.


All the Blocky Owls!


Same method as before - I downloaded the digistamp from issue 109 of Simply Cards and Papercraft, printed them onto my special stamping paper, and then coloured them using my Spectrum Noir pens. Each owl took between 5 and 10 minutes to colour.


"Blue Steel" Blocky
"Aqua" Blocky

"Blush" Blocky
"Elf" Blocky

"Ice" Blocky
"Halloween" Blocky

"Violet" Blocky
"Valentine" Blocky
"Jungle" Blocky

Tuesday 2 April 2013

Owl Mania ... 2 !!

I enjoyed colouring Owls so much, I decided to go right ahead and design some "Chubby" owls. I used the same method as before: download digistamps from Issue 101 Simply Cards and Papercraft, print onto stamping paper, colour using Spectrum Noir pens.

NB - I did not name these owls "Chubby" - that's the name of the digistamp given by those who designed it!

The Chubby Collection
I only used two colours for each owl (except the Halloween one, where I coloured the eyes for a more spooky effect). Each owl took around 10 minutes to colour properly - the areas are bigger than the Wise Guy owls, which meant I had more area to cover but needed to take care to get the colour cover even across the owl.


Chubby Owl "Ice"
Chubby Owl "Aqua"


Chubby Owl "Plum"
Chubby Owl "Valentine"
Chubby Owl "Jungle"
Chubby Owl "Violet"
Chubby Owl "Elf"
Chubby Owl "Wizard"
Chubby Owl "Halloween"


Owl Mania!

A couple of weeks ago, the latest issue of Simply Cards and Papercraft arrived through my front door and I was really excited to see that they were offering a set of free owl digistamps. For those of you who don't know, a digistamp is a digital version of a normal stamp; instead of inking and stamping as normal, you download and print the stamp out yourself. Either way, after you've got your stamp, you can colour it however you choose.

9 Wise Guys!
I started today with the "Wise Guy" stamp. I printed 9 small Wise Guys onto a sheet of stamping paper that I bought from Create and Craft (I can't remember exactly what it is but I must find out before I fun out!) and then used my Spectrum Noir pens to colour them. I've experimented with colours a bit and created 9 different owls from the same stamp - and I could have kept going! I'm hoping that I'll be able to cut them out and use them to decorate the fronts of cards with - I'll keep you posted on that one!


"Halloween" Wise Guy
"Valentine" Wise Guy


"Ice" Wise Guy
"Aqua" Wise Guy


"Prince" Wise Guy
"Wizard" Wise Guy


"Jungle" Wise Guy

"Plum" Wise Guy
"Marshmellow" Wise Guy

I also have owl digistamps for, "Big Mister", "Blocky", "Chubby" and "Masked", so watch out for those!

Monday 1 April 2013

Easter Crispy Cakes!

I was watching the Great British Bake Off on TV this afternoon, and it inspired me to do some baking over the Easter holidays (although this is often a risk as I'm not known for my baking, but practice mkes perfect and all that...)

So, I started looking through the recipe books that my mum kindly bought me for Christmas and found some recipes that looked promising (and within my culinary grasp).

To begin with, I thought I'd go with the Easter classic Chocolate Crispy Cake, topped with Mini Eggs. They were really easy to make and they taste so good!

Happy Easter everyone!! =D


Funky fairy cake cases! (In pink, teal, light green and lemon yellow)