Saturday 28 October 2017

Postcards Around the World - October

A couple of days ago, I finished the October installment for my Postcards Around the World cross stitch - a few days ahead of the end of the month deadline, are you impressed??

This month it was New York. It was a fun one to stitch, even if I'm not sure about some of the colour choices. But I went with it because it still looks like fun, and it's obviously meant to be New York.

October - New York

The whole picture so far - September and October completed.
November and December will go along the bottom row next to New York. After that, I need to go to the top to start January, and I've sill got to stitch the top three frames for January, February and March (which is why you can't see them in the picture!) In fact, I've also got to finish the frame for April as well!!

Sunday 1 October 2017

Something for Miss Beauregarde

Just a quick one to show you the Blueberry Muffins I baked today from my Mary Berry 100 Recipes Book - very kindly bought by a girl in my class last year as an end of year present!

The recipe is very simply plain flour, baking powder, caster sugar, lemon zest, melted butter, eggs, milk, vanilla extract and blueberries, to cook in the oven for 25 minutes.

Fit for Violet Beauregarde 
Ok, so the blueberries leaked a bit. But they still taste good so what does it matter?! =D Best of all, they're not so sweet so they'd make a good healthy breakfast muffin. That is, assuming there's any left of course!

Postcards Around the World - September

This was a Stitch-Along project I brought from Cloud Factory *ages ago*. The idea being that every month, starting from January, you get sent part of the design. Except, I forgot to start in January. So, I've decided to start with September in line with the academic year instead. Makes sense, right??!

September's postcard was Tokyo. I also had to stitch the white frames for other months so that I knew where to put this one, which took a fair bit of time, but the Tokyo postcard itself didn't take very long.

The Bigger Picture
The fabric that I've chosen is  hand dyed fabric that I bought online - it reminded me of old style postcards. I don't think the pictures do it justice -it's an oatmeal/brown sort of colour.

September - Tokyo
October is New York - a place I've actually been to! Stay tuned to see that one soon =)

Greetings!

A little while ago, I made some cards for some good friends of mine. It was the same weekend I'd been going through my old World of Cross Stitch magazines so I was inspired by the mini designs that they feature in their issues.

For Christina
This was a birthday card for a friend that I made using my Sissix Die cut machine. I cut squares of pink and blue squared paper and layered them on my blank card. Then, I used my Happy Birthday die to cut the main motif from pink card. Once I stuck it all down with foam pads, I stuck self-adhesive rhinestones in the corners. In total, a pretty quick design but I was happy with how it turned out!
For Kat


This was a mini cross stitch that I found in a past issue of World of Cross stitching. It took me a couple of hours to stitch and then I frayed the edges of the fabric. To make the card, I cut a square of blue card and stuck the cross stitch onto that with double sided tape. Underneath the blue square is washi tape. At the bottom of the card I put some more washi tape and a ribbon with a hand tied bow and then the "Congrautlations" wording came from my Sizzix machine.
For Claire


This was another mini design from a past issue of the World of Cross Stitch magazine. The whole article was a A-Z of Oriental designs. I picked this one because my friend loved her visit to Japan. Again, this one only took a couple of hours to stitch, and then I frayed the edges and mounted it on pink card with washi tape underneath.


I am also in the process of stitching Christmas cards for my sister-in-law. Yes, it's early, but still!! I won't post them yet because I don't know who they're for and I'd hate to spoil the surprise!!

Sunday 3 September 2017

Ribbon storage hack

It's back to school tomorrow! Unfortunately, that means significantly less crafting time =( However, I did manage to do a quick project this afternoon that I thought I'd share with you quickly. Especially as it's more of a life hack rather than an artistic masterpiece.

This was an idea I saw from Pintrest - effective ribbon storage! Up until now, my rolls of ribbon have been in a box getting a bit tangled and this idea seemed to be an easy solution!


Post pliers treatment!
 All I did was find a wire coat hanger - I probably didn't choose the best one as it was quite thick to cut and was coated in white paint that flaked everywhere. I used a pair of pliers to untwist the top. Then, you can just put your rolls of ribbon on and twist the hanger back together again.

Now I can easily see which ribbons I have available to use in my scrapbooking and card making! It's hanging on the window latch in my craft room The bad news is, that hanger is now full so I'll either have to stop buying ribbon or find another coat hanger and make another one!

Complete with colourful ribbons!

So, it may be a while before I post any more craft updates, being back at school and all. But, I did make some cards that I'm rather proud of a few days ago, so when the recipients have got those I'll share them with you!

Tuesday 29 August 2017

Project Garden Haven

Some of you will know that I'd been planning a surprise birthday barbecue for Bren for months. The key to this, obviously, being outside. So, when I saw that someone was giving away free garden furniture on Facebook I snatched it up quickly - 8 plastic chairs and a table, that'll come in handy thanks very much!

Of course, that was just the beginning.

Once my mum and I put that in the garden, we started to trim back some of the blackberry brambles. Anyone who'll have seen this in the first instance will know how that blackberry bush dominated my garden. The previous owners had planted it in a bunker in the back left corner of my garden, but blackberries also grow in from both neighbour's gardens - it's just everywhere. We were pulling on vines and finding that they extended through the trees into the neighbour's garden. It was like a horror scene from Jumanji. So, that's when we decided to take the whole bush out. Logic being, we still get plenty of blackberries from the sides of the garden if we want them, and the dogs only ever eat the thorns anyway.

2 hours later, the job was done. Unfortunately, I don't have a before shot as it was a rather spontaneous event. In those 2 hours, I started to plan other improvements that I might make in the garden.
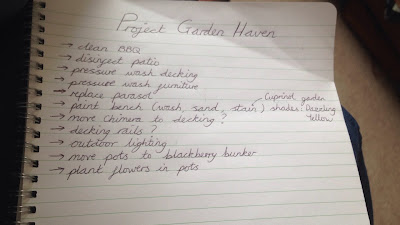
Just a small list...!

Basically, I'd set myself a mammoth task to be completed in 10 days. A visit from Groundforce wouldn't have been entirely unwelcome - out of me, Mum and Lizzie I wouldn't like to say who was Alan Titchmarsh!! 

Pressure washing the decking was a long, but oddly satisfying job. Who knew the decking was actually a different colour?? Then, once the furniture was installed I decided to buy a new parasol and base. This I was particularly pleased with, because I knew it had LED lights on the inside, but I didn't know you could change the colour of them - that was a great discovery after a few drinks!! =D

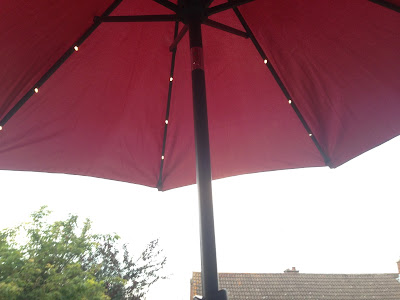
With white, red, green and blue LEDs

Mum and I also installed some more colourful plants where the blackberry bush was.

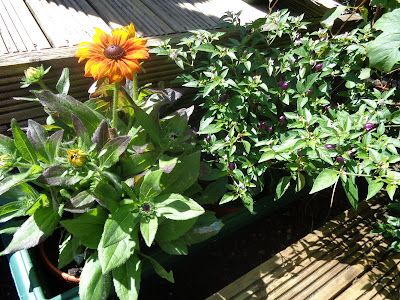
Cone flower and Chilli plant

Lavender and Hyacynth
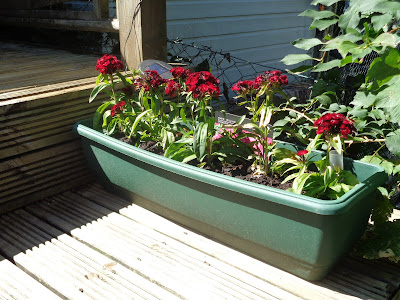

Sweet Williams

More Sweet Williams


The biggest part of Project Garden Haven was repainting the wooden bench that used to be at my parents' house. When we first bought it to our house I remember saying I'd repaint it, then I said it again after Mum and I rescued it from underneath the mass of brambles. YouTube (and Liz) was a great help here!
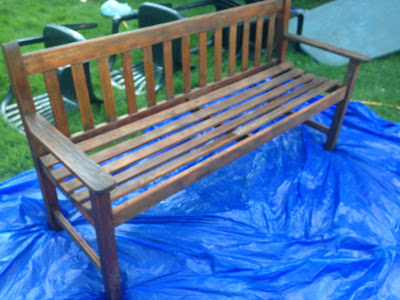
Bench: Before

First I pressure washed the bench, which cleaned it and also took off a lot of the old brown paint. Then, we used sandpaper to get rid of all the paint and to get smooth, bare wood. That took about 2 or 3 hours - we had skinned finger pads by the end of it, but it was a good result! I could have left it as it was had I not already chosen the new paint colour!

Bench: After sanding

Then, I put on 2 coats of wood preserve. At this point in Project Garden Haven, it rained on and off for 3 days, so there was a lot of concern about whether it would be finished in time. But then, the weather was glorious on one Sunday so I managed to get both coats of paint on and dry before it rained in the evening. I chose a lemon yellow, thinking it would stand out against the brown decking. And also, yellow is a bit more gender neutral than, say, purple!
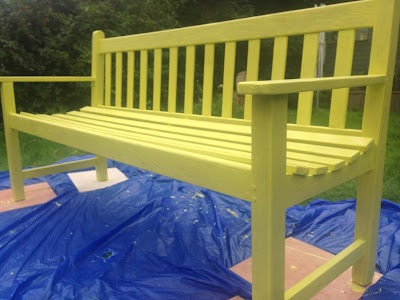
Painted - Cuprinol: Dazzling Yellow

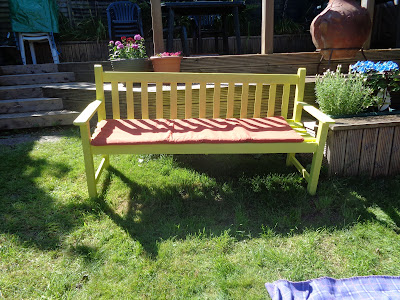
In the only flat place in the garden!


After all of this, the garden was finally ready. Or, you know, as ready as it was going to be! From start to finish, including rain, it was about 10 days of work. The original plan was for my husband to see on the day of the party as he'd be home the night before when it was dark. Of course, he came home a day early so he saw the garden. I managed to tell him that it was just a summer project with no hidden agenda...! Thankfully, on the day of the barbecue the sun was out and everyone could enjoy the garden! Some of Bren's friends eve moved the chimenea up to the decking for us so we could have some heat in the evening =D
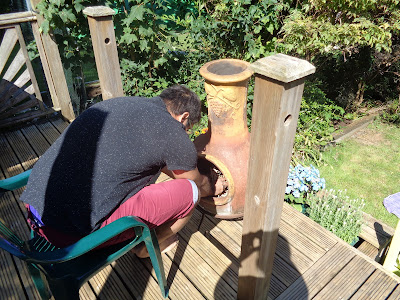
Kumbayah! 

Monday 21 August 2017

My 16th Love Quilts Square

This square is for Ellie's heart themed quilt. For this, I decided to reuse the heart swirl pattern that I stitched before because it was so much fun. Ellie's favourite colours are pink and purple so I chose a 3 different shades of pink and purple and also a cream colour. I had fun balancing out all the colours. Once the black is stitched it's mostly just filling in he swirls :)


Hopefully, Ellie will like it and it'll look good with the other heart themed squares on her quilt.

I haven't signed up for any more Love Quilt squares right now, so I will return to my wedding photo cross stitch and - as lots of people have been asking - post an update of that soon!

Friday 11 August 2017

Scrapbooking: J is for Jazz, V is for Vintage Cinema and A is for Albufeira

I completed these latest pages of the Alphabet Adventure yesterday. I ordered the prints from Snapfish and then started raiding my craft stash!
V is for Vintage Cinema
This was the first page I made. We went to see "Shaun of the Dead" at the Hellfire Caves (they were having a whole horror movie season; Shaun of the Dead being the tamest movie I could tolerate!) When we arrived, they gave us a quiz sheet and we had to go around the caves looking for visual clues to describe a well-known horror movie. Except, obviously, I don't know many horror movies so Bren completed most of it! (evidence top right). I think we got 7 out of 10, but there were 2 other pairs who got 10 out of 10 so we didn't win. Then we sat on comfy bean bags and ate dinner and had popcorn and watched the movie - was great fun! Check out www.vintagecinema.co.uk for tickets.

In terms of making the page, first I chose a background page from my "Noir et Chic" 12 x 12 inch background paper stack. I arranged the photos and stuck them down using clear photo corners. I added the fun cinema themed decoupage shapes that I bought from Hobbycraft. I used my wooden scrabble tiles to make the title and stuck it down with foam squares. I cut the tag from cream card using my cutting machine, then added the fabric letter (also from Hobbycraft). Then, I stuck on a red flower button and some gold ribbon, which actually came off a box of chocolates =D Finally, I added some red adhesive gems in the corners.

J is for Jazz
I made this page next. We went to see a Jazz band at Cliveden - I found them via Google search and they were playing every Saturday in June. It was a gorgeous day so we took a picnic to eat while listening to the band play - who were excellent - and then walked around the gardens.

To make this page, I used a background paper from my "Dreamcatcher" 12 x 12 inch stack. I don't know if you can tell from the photo but it's glittery =D I used the same techniques to make the title and tag as I did in the last page. This time I stuck in the map that we got on the day and also some 3D butterfly stickers.


A is for Albufeira 

A is for Albufeira

 These were the last pages I made. I used paper from my Grace Taylor "Playtime" 12 x 12 inch pack. Again, I used the same techniques to make the title and tags, and added in some holiday themed decoupage pieces and stickers from Hobbycraft. I also used foam squares to stick down the boarding passes from our flights.

The first page mostly shows the views from our hotel at Saint Eulalia. The second day shows our adventures at Pescadores Beach, including a bit of impromptu rock climbing!


I don't think we have our next Alphabet Adventure planned yet, although we still have letters D, E, F, G, H, K, M, N, O, R, U, X and Y to go!

Tuesday 8 August 2017

My 15th Love Quilts Square

I've just finished my 15th Love Quilts square for Jessica. It's a horse themed quilt and her favourite colours are dark pink and purple, so I decided to reuse my rocking horse pattern but change the colours.

Neigh!
Each horse has either pink or purple on in an alternate pattern. I'm pretty pleased with some of my colour combinations this time, especially bottom right, middle and the top row. I'll probably stitch those again =)

My next Love Quilts square is for Ellie's heart themed quilt - also in pink and purple. I'm aiming to have that one finished by the end of the month because even though the deadline isn't until the end of September, school is bound to get in the way!

In other news, I'm also working on the latest scrapbook pages for the Alphabet Adventure. Stay tuned for J is for Jazz, C is for Carnival, V is for Vintage Cinema and A is for Albuferia.

Sunday 2 July 2017

Gingerbread Rainbows

Last week, the Rainbows decided to have a bake sale to raise money for a local charity. (They made posters and invitations for the Brownies and everything - it was really cute)

So, my contribution to this Bake Sale are my trustyworthy Gingerbread Rainbows (not men!)


Gingerbread Rainbows!

Each wearing decorative buttons, jewellery or hair pieces


Standard recipe: plain flour, butter, light muscavado sugar, ginger, golden syrup and egg for the dough. Then to decorate I made royal icing (from icing sugar and water) and stuck on sugar decorations.

I think I like the hair daisies best =)


The only problem is, now I've got to refrain from eating them!!

Tuesday 27 June 2017

Three Tatty Sailors

Tonight, I was determined to get this cross stitch finished. I definitely started it in 2016 - I did one of the bears as a Love Quilts square and then started the complete design to hang in my spare room.

I love all things Tatty Teddy, but the backstitch on these designs is so fiddly and time consuming! I did the actual cross stitch in a few weeks or so maximum, but the backstitch requires so much brain power and squinting. I'm certain it's not how it is on the chart, but I'm sure it'll look good once it's framed and on the wall!

DMC Tatty Teddy: Three Little Sailors

My wedding cross stitch project is still ongoing - I'll post some photos of the progress soon! I've also got 2 more Love Quilts squares coming up - rocking horses and swirly heart (both repeat designs but different colours).

Monday 26 June 2017

Scrapbooking: B is for Ballet, P is for Picnic, Q is for Quiz and W is for Waffles

I've just realised it's been a while since I updated my blog, even though I've been working on several craft projects!

So, here's an update on our Alphabet Adventure - going back some time now!


In May, we went to see "Cinderella" the Ballet at the theatre in town (which was so awesome we're going back to see the same company perform "The Nutcracker" in November =D). As well as using photographs and our tickets, I added the customary label and some diet cut ballet shoes. I mounted them on some tissue paper - which is supposed to look like a shoe box, in case you didn't get that! - and added some pearls and ribbon.

B is for Ballet

In the Easter holidays, my husband, sister-in-law and her husband (my brother-in-law? Does that work? Let's say yes...!) decided to try a pub quiz. Long story short: it was aimed at a slightly *ahem* older audience and we came last. But only just!!! Great quiz though - I'd do it again for a giggle. Remind me to watch more UK TV Gold first though...


Q is for Quiz

One weekend when we were blessed with glorious weather, Bren and I had planned to go out for a picnic. You know, somewhere scenic. Except he became so absorbed in cutting the grass by the time he was finished I was majorly hangry, so we had our picnic in the back garden instead! Bonus was that Millie and Mollie could join the picnic too!

P is for Picnic (and pooches!)

Lastly, we went to the Waffle House restaurant in St. Albans. It's set in an old water mill. They serve savoury and sweet waffles. We both had French Onion Soup to start and then a white chocolate and mousse waffle for pudding (Bren copied me! haha) Was a tasty way to spend an afternoon, even if the queues to get in were long!

W is for Waffles

That's all I have for now. Coming up in the possibly-near-future: J is for Jazz, C is for Carnival and V is for Vintage cinema.

Tuesday 4 April 2017

Scrapbooking: L is for London and I is for Ireland

The Alphabet Adventure continues! True to form, we've not been going in order. Where's the fun in that??

L is for London

In February half term (weeks before the terrorist attack), Bren and I took a trip into Central London. We used to spend lots of time in London while he was going to university there, but I'd never seen the Houses of Parliament, Big Ben or Westminster Cathedral. We also had to rescue Bren's bag that he'd left in Kensington the night before after a few too many drinks...!
This was an easy page to scrapbook once I'd chosen the backing paper and label materials, and I had a packet of London themed embellishments from which I chose the flag, bus and tube sign.

L is for London

I is for Ireland

I is for Ireland was far harder to scrapbook. We actually went to Ireland in October half term (it's taken me this long to get the photos printed!) and did a 5 days tour of Dublin, Galway, Killarney and Cork. Long story short, I had 100+ photos to choose from - so I had to edit. Even as I was making the pages I was editing based on lack of space!
I chose the baking paper from a "Wild Flower" scrapbook backgrounds pad that I bought from Hobbycraft on Friday. I like to use the same background for the same event, and there were only 3 of these in the pack so I'd challenged myself to fit the photos onto 3 pages. (All of the other letters so far only have 1 page by the way!)

"Wild Flower" background paper

Then, after A LOT of experimenting, I settled on these pages.

I is for Ireland: Dublin

I is for Ireland: Dublin to Galway to Killarney

I is for Ireland: Killarney to Cork to Dublin again.

Stickers that I found by chance in Hobbycraft - seemed appropriate!
These pages almost don't do it justice because of the number of pages I left out, but I'm still pretty happy with the results.
Also, I took that photo of the sheep as it was standing on a grass verge next to our car, and it wasn't zoomed in at all. We think it was hitchhiking!

I'm not sure what the next Alphabet Adventure will be yet - we still need letters A, C, D, E, F, G, H, J, K, M, N, O, P, Q, R, U, V, W, X, Y, Z. Post your suggestions please!

Sunday 26 March 2017

Stitch a Photo - Week 1

It's been a week since I started my wedding Stitch a Photo kit. So far, I've got as far as stitching the very edge of Bren's side and my neck and top part of my dress. There are lots of colour changes!

The photo I'm Stitching.


The first few stitches of Bren's suit.

The start of my veil.

More veil!

Such a huge chart for a small piece of fabric!

The start of my dress

Start of my shoulder

Starting to look a bit more like me!

The chart - Page 5 of 9
There's a lot of fiddly stitches at the bottom of the page which I'll tackle this week - I think that's where my bouquet starts. Bren's suit is a lot more straight forward, but I may decide to change the colour of his tie, as it was more blue in the photograph than the purple that it was.

Overall, I'm pleased with my first week's progress! This week is Activity week in school (less marking so more stitching opportunities) and then 2 weeks for Easter holidays (more stitching opportunities!) so I may get this page finished. After that, progress will most likely be slow. I think the original finishing estimate of *years* may still be accurate!