Thursday, 11 October 2018

Great British Bake Off: Week 4 - Desserts

It was tricky to decide what to make for this challenge, but in the end I settled on a classic: the bread and butter pudding.

For this one, I consulted the old family cook book, which is a cook book that was published in 1968 but I always remember my Mum using it at home (and I guess my Nan before her). That book is also responsible for my favourite macaroni cheese recipe!

Now, it's probably fair to say that my Bread and Butter pudding wasn't as good as my Dad used to make it (and you'll certainly never hear me say that again!) but it was still tasty, and my husband seemed to enjoy it. I remember it being slightly crunchier on the inside though...no food poisoning today though, so must have been ok!!

Golden Brown!
Week 5 was spice week, so of course, I'll be making gingerbread biscuits! The real question is, do I do the fancy piping like they do on the Great British Bake Off?? (Spoiler - I'm rubbish at piping!)

Great British Bake Off: Week 3 - Bread

Yes, I know it's late!! I actually made this weeks ago but we've had a lot of busy weekends lately so I've gotten behind with all of the other challenges!

So, the third week of the Great British Bake Off was bread. I have to be honest, I used my bread maker for this one. My bread maker is a fairly key part of my kitchen, because a lot of shop bread has vinegar in it (which I'm allergic to) but fresh bread from the bread maker doesn't need it.

So, bread week was a good chance to try a new bread making recipe. I went totally adventurous and tried a chocolate and almond pannetone. It was essentially like chocolate bread - not the marbelled stuff you get in the tin at Christmas. But it was still nice!

Any chance for Bren to use the "food" mode on his camera phone...

Week 4 of the Great British Bake Off was desserts, but I only actually got round to completing that challenge yesterday: stay tuned! (I'm sure you're all on the edge of your seats haha)

Sunday, 7 October 2018

Love Quilt Square 23

Despite saying that I would concentrate on other stitching projects for a while, I quickly backtracked and signed up to stitch a square for Tillieasha. It's a unicorn and fairy themed quilt, who am I to resist??

I found a gorgeous unicorn chart on Etsy which uses different shades of purple and blue to create a galaxy effect. I was so excited to start I got started almost straight away!

I soon discovered that the colour gradient effect is achieved with mixed threads. That is to say, out of the 2 strands of thread you're stitching with, both strands are from different colours which are very close together on the colour wheel. I might do a section of DMC 209 and then I'll need to do a section of  209/208 combined, then a section of 208. It does look really effective, even if I have to really concentrate on the chart!

All in all, this one didn't take me too long to stitch and I really enjoyed seeing it come to life. Even more so when I added the backstitch. I think it'll look brilliant on a quilt.

Galaxy Unicorn
The only issue is, I want to stitch this for myself now! Do you think my husband would be ok with a unicorn picture in our bedroom?? =D

As things stand, I haven't signed up to anymore Love Quilt squares...honestly!

Sunday, 2 September 2018

Great British Bake Off Week 2: Cake week

My husband especially requested a carrot cake for his birthday this year. I usually make carrot cupcakes and - if I'm being honest - the last large carrot cake I made was a Betty Crocker ready mix one!


However, after rifling though my collection of recipe books I did find a suitable recipe - sultanas, grated carrots (Note to self: must figure out how to use grating attachment on the food processor. Grating carrots by hand is tough!), orange juice, wholemeal flour, self-raising flour, brown sugar, eggs and sunflower oil.


Mix it all together and bake in the oven for 45 minutes.

Then, I had to be really patient and allow the cake to cool completely before I put the frosting on.


Decorated by the Birthday Boy himself

The frosting didn't turn out how I'd hoped, despite following the recipe. It was far too runny and just slipped off the cake, which was a shame. I still think I'd have been eliminated from the Bake Off tent! However, it tasted good and as the cake was quite small the ratio of frosting to cake was ok. Next time, I think I'll keep the same cake recipe but use a stiffer buttercream icing from my Primrose Bakery book.


A finished slice

Everyone seemed to enjoy the cake! In fact, the Birthday Boy had a slice for breakfast today and a slice after his afternoon cycle. There's only a small slice left now, which I doubt will last until tomorrow!

Wednesday, 29 August 2018

Great British Bake Off Week 1: Biscuit Week

Had to be done, guys! Who knows how far I'll get this year haha.

Disclaimer: There are NO spoilers for the TV show.

So, as you may know, the Great British Bake Off returned to our screens last night with biscuit week. Was anyone else expecting cakes?? Today, I decided to follow suit and make some biscuits of my own.

Gone with the original here...

Mary's "Melting Moments" recipe is pretty simple: butter, self-raising flour, egg yolks, golden caster sugar and vanilla extract. I mixed all of that to make a dough, then divided it into 36 lumps which I then coated in oats. I put half a glace cherry on top but that's optional.

Ready to Bake!
Batch 1 of 3 - ooops!

Batch 2 of 3 - Better!
Spot the difference!

Batch 3 of 3 - Better!


All in all, I'm pretty pleased with today's efforts. Took less than 2 hours, but I think if I'd done this in the Bake Off tent I'd definitely be going home! Good job my husband isn't as fussy as Paul Hollywood!

Next week, I'm guessing it's cake week. I was actually planning on making a cake for my husband's birthday this weekend, so I'll be ahead of myself!

Tuesday, 28 August 2018

Love Quilt Squares 17 - 22 (phew!)

It's been a while since I've uploaded my Love Quilt squares, but I've actually managed to do a lot! Somehow, I didn't manage to take photos of all of them, but you can see all of my squares on my Love Quilt Stitcher page by clicking here.

Square 17 for Jessica

Square 19 for Thomas

Square 20 for Lucy
Love Quilts Square 22

I enjoyed stitching these Disney princesses - they were my first ones and I'm happy with how they turned out. That said, there was an awful lot of back stitch on Cinderella so I may find a different chart for her next time.
I haven't signed up to any more quilts at the moment, there are some interesting quilt themes coming up soo that I might be tempted by!

Monday, 13 August 2018

Summer Sorbet

In case you missed it, the U.K. had a glorious and completely unprecedented heat wave this summer! (Which has now ended as quickly as it started..was good while it lasted!) So, I felt inspired to get my ice cream maker out...if nothing else as an attempt to save money on endless tubs of ice cream from the supermarket!


To help, I bought myself a copy of "I <3 my Ice Cream Maker" which has loads of easy recipes for ice cream, sorbet and frozen yoghurt. So far, I've tried the raspberry sorbet, strawberry sorbet and the pistachio ice cream - all good!


Basically, you start off by heating caster sugar and water until it boils and the sugar dissolves to make a syrup. Then, while that's cooling you blend the fruit together to make a puree. Once the syrup is cooled, mix in the fruit puree and let it cool a little more before putting it in your ice cream maker to churn and freeze.

300g raspberries
400g strawberries

Obviously, the quantities of the ingredients vary with each recipe, and you also have to put the finished mixture in the freezer before you eat it. Well actually, you don't, but you should...!

The raspberry sorbet is Bren's favourite, but I think I like the strawberry sorbet more. Not sure if it's actually cheaper than the stuff you can buy in the store once you factor in the cost of the fruit, but it does taste good! Some of the ice cream recipes I'd like to try in the future are Sunflower and Honey ice cream, Mint Chocolate Chip ice cream (for Bren, not me) and Rocky Road ice cream. I reckon I could attempt a Mango sorbet and Coconut sorbet, even though I don't have a specific recipe and I'd b guessing the quantities! There's even a recipe for Balsamic Strawberry ice cream in here, which I will not be making - I refuse to be allergic to ice cream!!

This is either Raspberry or Strawberry Sorbet...they look the same to be honest!

Friday, 10 August 2018

What can I say except "You're Welcome?"

Don't worry - this isn't actually a link to Moana. I've actually never seen it!

I'm currently working on a Love Quilts Square, but I ran out of thread so I had to order some more. So, while I was waiting for the threads to arrive, I started a mini-cross stitch project of a butterfly that I got as a Secret Santa gift.

I took a few photos as I finished each colour because I thought the way that the colours blend together is just really pretty and effective.

First dark blue....

...then turquoise...

...and aqua green...

...then red and yellow highlights...

...and black...

...and then the leaves.

Finally the back stitch on the leaves...

...and the back stitch around the butterfly and the words. Finished!

I'm really happy with the finished product! I've trimmed the excess fabric off and threaded a piece of white ribbon through the top of the hoop so I can hang it in our hallway. As for my next project; those replacement threads arrived this morning so I can go back to that Love Quilts square!

Wednesday, 8 August 2018

Scrapbooking: H is for Harry Potter

I solemnly swear that I am up to no good! 
This was an Alphabet Adventure that we had last year, but it came in two parts. First, we went to see Harry Potter and the Cursed Child at the theatre. If you love Harry Potter and you haven't seen it and you get the chance to go you MUST because it's amazing! Even if you don't like Harry Potter and you get the chance to go you SHOULD because the special effects are just incredible! Neither of us have seen anything like it on stage. But... #KeepTheSecrets

The second part of the Alphabet Adventure was at the Harry Potter Studio Tour, which was a 30th birthday present from my friends =) This was my third trip, but there was still so much new content that I'd not seen before. We went around Halloween during the "Dark Arts" Event - I actually almost walked straight into a Death Eater in Diagon Alley. It was terrifying! I'd also never seen the Forbidden Forest or the Hogwarts Express before - we had a lot of fun on Platform 9 and 3/4!

Anyway! For this scrapbook page I picked a background paper that looked like the Marauder's Map and changed the background using the house crests of Hogwarts. To make these I used my die cutting machine. Yes...I have official Hogwarts dies...the Danger Channel has everything! (Danger Channel = Create and Craft. Website link on the right.) Then, I stuck them onto the background to make it look more like "Hogwarts Paper"

Intelligence and Wit

Hard Work and Loyalty

Ambition and Cunning
Brave and Daring


I was also thinking, these dies would be great for making Harry Potter themed stationary, like notebooks, paper or folders.

Finally, I stuck the photographs onto the background paper, made the tag and arranged the letters - I tried to make a lightning bolt; didn't work! I'm still pretty pleased with how the page turned out though. 

H is for Harry Potter: Parts 1 and 2

Unfortunately, I'll have to wait a while to do the page for "F is for Festival" because I haven't had the photos printed yet. That's our most recent Alphabet Adventure and we haven't planned the next one...anyone have any ideas for D, E, G, K, M, N, O, R, U or Y??

Mischief Managed! 

Tuesday, 7 August 2018

Scrapbooking: X Marks the Spot


It has been a REALLY long time since I updated my blog =( It's not that I haven't been crafting, but somehow I just haven't found the time to actually upload any of my creations. Maybe it's because I've been too busy crafting!!

Anyway, I'll gradually upload some of the things I've been doing and some of the new things I've been doing, but first: something I've literally just finished.

So, my husband and I have been doing this Alphabet Adventure (yes, we're still doing that!!) where we do an activity beginning with each letter of the alphabet. You can see some of the scrapbook pages of previous letters if you flick back through my blog, you know, if you're interested.

X was always going to be a hard letter, so we sort of cheated a little bit with the naming of it...! For this one, we went into London for a Hidden City treasure hunt called "The Hunt for the Cheshire Cat". First of all, I would totally recommend Hidden City - we had so much fun! I won't spoil it for you, but basically: we started at the National Portrait Gallery and we were then text a series of clues to our mobile phone, which we had to follow and text back the answer. If we had the right answer we'd be sent the next clue. We walked around a fair bit of London and saw some fabulous new places. Best of all, the route took us via some cafes and pubs so there were plenty of chances for a snack and a drink! =)
C
X Marks the Spot!
So when it came to scrapbooking this activity, I tried to include lots of "Alice in Wonderland" references. I chose the backing paper because it looked like the fur of the Cheshire Cat (the one that we were hunting for, not the Disney one. But as you can see, there's a Disney Cheshire Cat in the bottom corner too!). I arranged the letters in the style of "tumbling down the rabbit hole" and in the top right corner there's a plastic button of Alice sitting in some tea cups. I made the tag from black and red like the playing cards and threaded a charm on white ribbon. The charm replicates the White Rabbit's watch - which we were given at the start of the hunt, by the way! (Yes, I did want to keep it...!) I finished the tag off with a white rose button, which I picked because it reminded me of the part of the story when playing cards are painting the Queen of Heart's roses.

The White Rabbit tag charm


Viewing my artwork in the National Portrait Gallery!! 
I am seriously talented!! 

I think this one has been our most original Alphabet Adventure yet! You can check out the Hidden City website here: https://cheshirecat.inthehiddencity.com/ They also do other themed trails; we may try the Sherlock Holmes one in the future.
The next Alphabet Adventures I need to scrapbook are H is for Harry Potter and F is for Festival, so stay tuned for those!


In the next few blog posts, I want to make up for my shameful silence and show you some of my recent cross stitches, knitting and baking. Also, I plan on getting back to dress making this month (the luxury that is school holidays!)

Saturday, 28 October 2017

Postcards Around the World - October

A couple of days ago, I finished the October installment for my Postcards Around the World cross stitch - a few days ahead of the end of the month deadline, are you impressed??

This month it was New York. It was a fun one to stitch, even if I'm not sure about some of the colour choices. But I went with it because it still looks like fun, and it's obviously meant to be New York.

October - New York

The whole picture so far - September and October completed.
November and December will go along the bottom row next to New York. After that, I need to go to the top to start January, and I've sill got to stitch the top three frames for January, February and March (which is why you can't see them in the picture!) In fact, I've also got to finish the frame for April as well!!

Sunday, 1 October 2017

Something for Miss Beauregarde

Just a quick one to show you the Blueberry Muffins I baked today from my Mary Berry 100 Recipes Book - very kindly bought by a girl in my class last year as an end of year present!

The recipe is very simply plain flour, baking powder, caster sugar, lemon zest, melted butter, eggs, milk, vanilla extract and blueberries, to cook in the oven for 25 minutes.

Fit for Violet Beauregarde 
Ok, so the blueberries leaked a bit. But they still taste good so what does it matter?! =D Best of all, they're not so sweet so they'd make a good healthy breakfast muffin. That is, assuming there's any left of course!

Postcards Around the World - September

This was a Stitch-Along project I brought from Cloud Factory *ages ago*. The idea being that every month, starting from January, you get sent part of the design. Except, I forgot to start in January. So, I've decided to start with September in line with the academic year instead. Makes sense, right??!

September's postcard was Tokyo. I also had to stitch the white frames for other months so that I knew where to put this one, which took a fair bit of time, but the Tokyo postcard itself didn't take very long.

The Bigger Picture
The fabric that I've chosen is  hand dyed fabric that I bought online - it reminded me of old style postcards. I don't think the pictures do it justice -it's an oatmeal/brown sort of colour.

September - Tokyo
October is New York - a place I've actually been to! Stay tuned to see that one soon =)

Greetings!

A little while ago, I made some cards for some good friends of mine. It was the same weekend I'd been going through my old World of Cross Stitch magazines so I was inspired by the mini designs that they feature in their issues.

For Christina
This was a birthday card for a friend that I made using my Sissix Die cut machine. I cut squares of pink and blue squared paper and layered them on my blank card. Then, I used my Happy Birthday die to cut the main motif from pink card. Once I stuck it all down with foam pads, I stuck self-adhesive rhinestones in the corners. In total, a pretty quick design but I was happy with how it turned out!
For Kat


This was a mini cross stitch that I found in a past issue of World of Cross stitching. It took me a couple of hours to stitch and then I frayed the edges of the fabric. To make the card, I cut a square of blue card and stuck the cross stitch onto that with double sided tape. Underneath the blue square is washi tape. At the bottom of the card I put some more washi tape and a ribbon with a hand tied bow and then the "Congrautlations" wording came from my Sizzix machine.
For Claire


This was another mini design from a past issue of the World of Cross Stitch magazine. The whole article was a A-Z of Oriental designs. I picked this one because my friend loved her visit to Japan. Again, this one only took a couple of hours to stitch, and then I frayed the edges and mounted it on pink card with washi tape underneath.


I am also in the process of stitching Christmas cards for my sister-in-law. Yes, it's early, but still!! I won't post them yet because I don't know who they're for and I'd hate to spoil the surprise!!

Sunday, 3 September 2017

Ribbon storage hack

It's back to school tomorrow! Unfortunately, that means significantly less crafting time =( However, I did manage to do a quick project this afternoon that I thought I'd share with you quickly. Especially as it's more of a life hack rather than an artistic masterpiece.

This was an idea I saw from Pintrest - effective ribbon storage! Up until now, my rolls of ribbon have been in a box getting a bit tangled and this idea seemed to be an easy solution!


Post pliers treatment!
 All I did was find a wire coat hanger - I probably didn't choose the best one as it was quite thick to cut and was coated in white paint that flaked everywhere. I used a pair of pliers to untwist the top. Then, you can just put your rolls of ribbon on and twist the hanger back together again.

Now I can easily see which ribbons I have available to use in my scrapbooking and card making! It's hanging on the window latch in my craft room The bad news is, that hanger is now full so I'll either have to stop buying ribbon or find another coat hanger and make another one!

Complete with colourful ribbons!

So, it may be a while before I post any more craft updates, being back at school and all. But, I did make some cards that I'm rather proud of a few days ago, so when the recipients have got those I'll share them with you!

Tuesday, 29 August 2017

Project Garden Haven

Some of you will know that I'd been planning a surprise birthday barbecue for Bren for months. The key to this, obviously, being outside. So, when I saw that someone was giving away free garden furniture on Facebook I snatched it up quickly - 8 plastic chairs and a table, that'll come in handy thanks very much!

Of course, that was just the beginning.

Once my mum and I put that in the garden, we started to trim back some of the blackberry brambles. Anyone who'll have seen this in the first instance will know how that blackberry bush dominated my garden. The previous owners had planted it in a bunker in the back left corner of my garden, but blackberries also grow in from both neighbour's gardens - it's just everywhere. We were pulling on vines and finding that they extended through the trees into the neighbour's garden. It was like a horror scene from Jumanji. So, that's when we decided to take the whole bush out. Logic being, we still get plenty of blackberries from the sides of the garden if we want them, and the dogs only ever eat the thorns anyway.

2 hours later, the job was done. Unfortunately, I don't have a before shot as it was a rather spontaneous event. In those 2 hours, I started to plan other improvements that I might make in the garden.
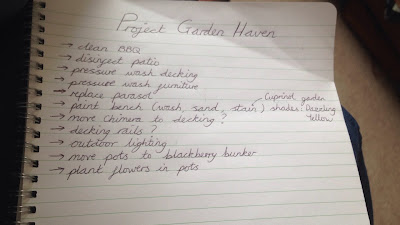
Just a small list...!

Basically, I'd set myself a mammoth task to be completed in 10 days. A visit from Groundforce wouldn't have been entirely unwelcome - out of me, Mum and Lizzie I wouldn't like to say who was Alan Titchmarsh!! 

Pressure washing the decking was a long, but oddly satisfying job. Who knew the decking was actually a different colour?? Then, once the furniture was installed I decided to buy a new parasol and base. This I was particularly pleased with, because I knew it had LED lights on the inside, but I didn't know you could change the colour of them - that was a great discovery after a few drinks!! =D
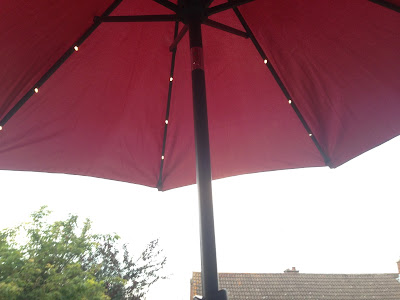
With white, red, green and blue LEDs

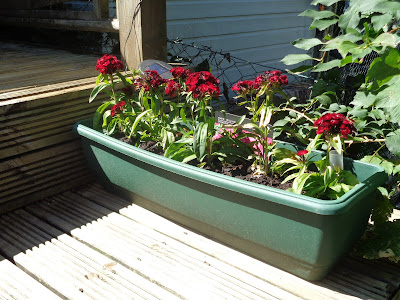
Mum and I also installed some more colourful plants where the blackberry bush was.
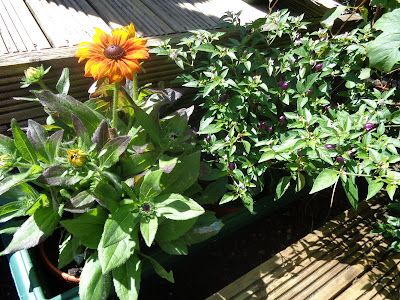
Cone flower and Chilli plant

Lavender and Hyacynth


Sweet Williams

More Sweet Williams


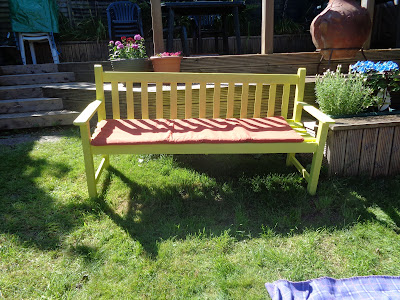
The biggest part of Project Garden Haven was repainting the wooden bench that used to be at my parents' house. When we first bought it to our house I remember saying I'd repaint it, then I said it again after Mum and I rescued it from underneath the mass of brambles. YouTube (and Liz) was a great help here!
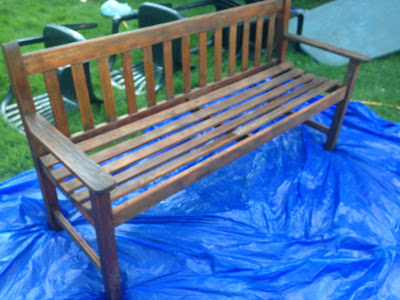
Bench: Before

First I pressure washed the bench, which cleaned it and also took off a lot of the old brown paint. Then, we used sandpaper to get rid of all the paint and to get smooth, bare wood. That took about 2 or 3 hours - we had skinned finger pads by the end of it, but it was a good result! I could have left it as it was had I not already chosen the new paint colour!

Bench: After sanding

Then, I put on 2 coats of wood preserve. At this point in Project Garden Haven, it rained on and off for 3 days, so there was a lot of concern about whether it would be finished in time. But then, the weather was glorious on one Sunday so I managed to get both coats of paint on and dry before it rained in the evening. I chose a lemon yellow, thinking it would stand out against the brown decking. And also, yellow is a bit more gender neutral than, say, purple!
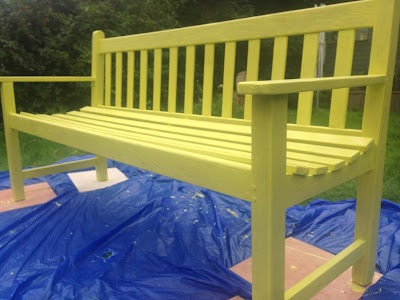
Painted - Cuprinol: Dazzling Yellow

In the only flat place in the garden!


After all of this, the garden was finally ready. Or, you know, as ready as it was going to be! From start to finish, including rain, it was about 10 days of work. The original plan was for my husband to see on the day of the party as he'd be home the night before when it was dark. Of course, he came home a day early so he saw the garden. I managed to tell him that it was just a summer project with no hidden agenda...! Thankfully, on the day of the barbecue the sun was out and everyone could enjoy the garden! Some of Bren's friends eve moved the chimenea up to the decking for us so we could have some heat in the evening =D
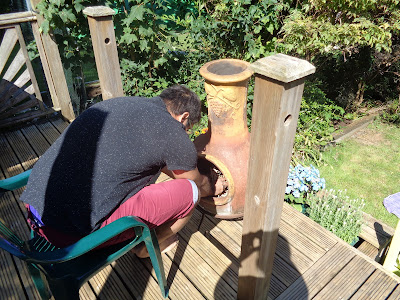
Kumbayah!